


Republished Tutorial
Every few weeks, we revisit some of our reader's favorite posts from
throughout the history of the site. This tutorial was first published in
April of 2011.
Step 1
We will be working in RGB color model, if you do not have it installed, go to File > Document Color Mode > RGB Color. Let's begin our tutorial by creating a background. Take the Rectangle Tool (M) and create a rectangle filled with a black color.
Step 2
Proceed to the creation of a match. Take the Rectangle Tool (M) and create a rectangle in the shape of a matchstick. Now fill it with a linear gradient of various shades of brown to convey the light distribution at the edges of the match.


Step 3
Create another rectangle of the same width as all the previous ones, as shown in the figure below. Set the gradient fill and Opacity to 0% in the Transparency palette.


Step 4
Proceed to the creation of a match head. Take the Ellipse Tool (L) and create a circle centered on the same axial line with the match.


Step 5
Fill the match head with a radial gradient that goes from dark brown to its light shades.

Step 6
Take the Pen Tool (P) and create a place where the wood is burnt. These areas are filled with a linear gradient composed of dark shades of brown color.
Step 7
Create pores on the match head. Take the Ellipse Tool (L) and create an ellipse. For the fill color, use solid color of the fill of a radial gradient of the match head. To take the color, use the Eyedropper Tool (I) and hold down the Shift to select.


Step 8
Now we'll proceed to create the match flame. At this stage, you should learn one important property: black objects when overlapping over other objects become transparent if you set the Screen Blending mode for them in the Transparency palette in RGB color mode.


Step 9
Create the shape of the flame. Take the Ellipse Tool (L) and create a circle. Using the Direct Selection Tool (A), pull the top anchor point up. The shape of the flame should be located in the under layer below the elements of the match.
Step 10
Select the shape of the flame, and go to Object > Create Gradient Mesh... and set the number of rows and columns in the dialog box.
Step 11
Thus, bring the lines and nodes of the gradient mesh to the view shown in the figure below. Flame is a movable object, so your grid can have a completely different shape.
Step 12
Select the gradient mesh with the Selection Tool (V) or by clicking on the appropriate under layer in the Layers palette and fill it with black. Set the Screen Blending Mode in the Transparency palette.
Step 13
Proceed to the coloring of the flame. Select the grid nodes and apply yellow and red colors to them. Nodes that lie beyond the borders of the gradient mesh should remain in black, otherwise we get the sharp edges of the flame, which is unacceptable.
Step 14
Create another object above the match. Using the technique described above, create a simple gradient mesh based on this object and color it.

Step 15
Now create two more feathers of the flame.
Step 16
There is no smoke without fire, and vice versa. Start creating smoke. Take the Rectangle Tool (M) and create a rectangle filled with black. And set the Screen Blending Mode in the Transparency palette.
Step 17
Keep the rectangle selected, go to Object > Create Gradient Mesh... and set the number of rows and columns in the dialog box.

Step 18
Now you need to bend the rectangle shape into the shape of a smoke stream. I used the following tools to transform such objects: the Direct Selection Tool (A), Lasso Tool (Q), and Rotate Tool (R).Let's take a look at the transformation technique. First, lock all the objects except the rectangle in the Layers palette. Place the rectangle at the right place in your work, take the Lasso Tool (Q) and select all the nodes of the grid, except those that are on the left side.


Step 19
Using the technique described above, create a few more streams of smoke.


Step 20
We only have to create a composition. Creating a composition in the technical sense is always the final stage. Of course, before creating the work, you should have an idea about the final result, you can even make a few sketches. But it is convenient to complete your work with this stage. Why do you think it is so?The thing is that it is easier to work with gradients if an object is placed vertically or horizontally. Imagine how much time you would spend on setting the gradients of the wooden piece of the match, if it was located at an angle to the normal line?
And the thing is not only in gradients, it is convenient to work with any object if it is located horizontally or vertically. Thus, unlock all objects in the Layers palette (in step 18, we locked some objects) and group up all the elements of our work and rotate them as shown below.

Now hide all the objects protruding beyond the background. Copy the black rectangle (background) and paste it in front (Command + C; Command + F). Move the under layer with the rectangle in the layers palette so that it is above all objects.


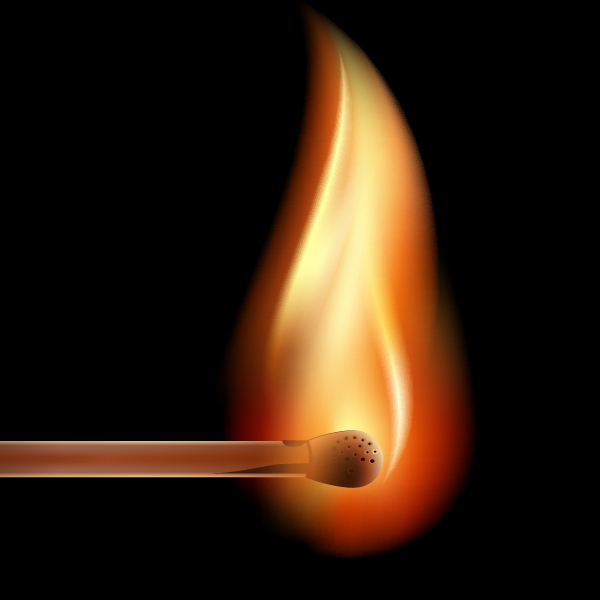
Conclusion
Having mastered the technique described in this tutorial, you can create realistic vector flames, lighters or torches. Who knows, you might want to make a fire? And give it some heat!